
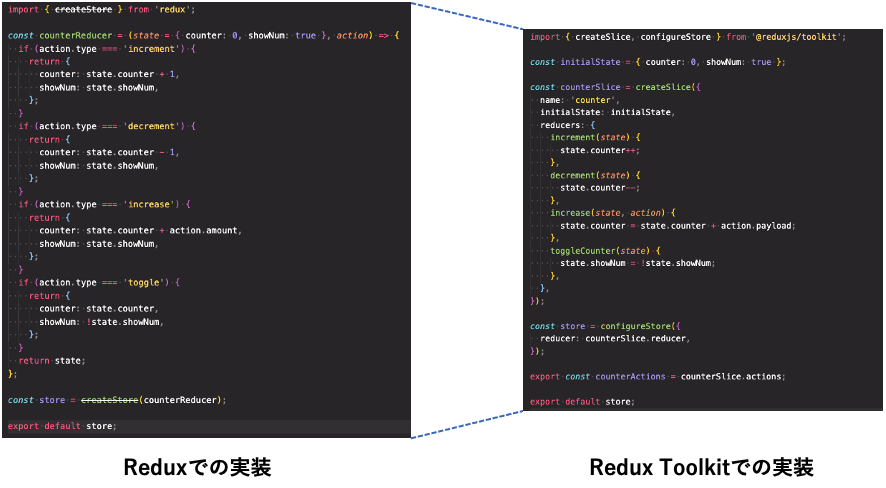
一つ前の記事で、Redux ToolkitはReactのReduxの記述をシンプルにできメンテナンス性も向上するとお伝えしました。
-

-
関連【React学習ログ⑤】Reduxを実装しながら解説してみた
続きを見る
ではこのままReduxだけ実装を続けていくとどんな問題があるのでしょうか?
主に下記の3つです。
- action.typeが増えてることで打ち間違えの危険性がある
- 管理するデータ数が増えていきReducer関数が長くなりファイルが見にくくなる
- 管理するデータを誤って上書きしてしまう可能性
Redux Toolkitはこれらの問題を一気に解決してくれます。
では解説を始めます。
ソースコードは前回の記事を元に実装しています。
Redux Toolkitをインストール
Redux Toolkitのインストール方法は、下記のコマンドを実施します。
npm install @reduxjs/toolkit続いてstore.jsを書き換えましょう。
import {createSlice, configureStore} from '@reduxjs/toolkit'

const initialState = {counter: 0, showNum: true}

const counterSlice =createSlice({
  name: 'counter',
  initialState: initialState,
  reducers:{
    increment(state){
      state.counter++;
    },
    decrement(state){
      state.counter--;
    },
    increase(state, action){
      state.counter = state.counter + action.payload;
    },
    toggleCounter(state){
      state.showNum = !state.showNum
    }
  }
})

const store = configureStore({
  reducer: counterSlice.reducer,
});
export default store;
1行目でcreateSliceとconfigureStoreをインポートしています。
configureStoreはReducer関数が複数になったときにそれらを一つにまとめてくれます。
ここでは書き方を覚えるぐらいで大丈夫です。後ほど活躍します。
createSlice関数はReducer関数が複数ある場合一つづつまとめることができます。
例えばですがピザを一枚まるっと食べるよりスライスして一枚ずつ小分けにしたほうがいいのと同じですね。。
つまり今はカウンター機能だけですが、ログイン/ログアウト機能など機能が増えても、createSlice関数を使うことで一つずつ管理することが可能になります。
createSlice関数は次の3つのオブジェクトを返します。
{
  name: Reducer関数のまとまりの名前
  initialState: 初期値
  reducers: action.typeで分けた分岐をオブジェクトでメソッドのようにまとめる
}
nameとinitialStateはわかりやすいと思うので説明を飛ばします。
reducersは通常のReduxではaction.typeで条件分けをしていた内容を、オブジェクトにして、それぞれメソッドに書き換えています。
それぞれ条件分けをメソッドにしたと考えると理解しやすいと思います。
また通常のReduxではreturnされたときは初期値で設定した、オブジェクトの内容と揃えた状態でreturnさせなければ意図しない挙動になると一つ前のブログで説明していました。
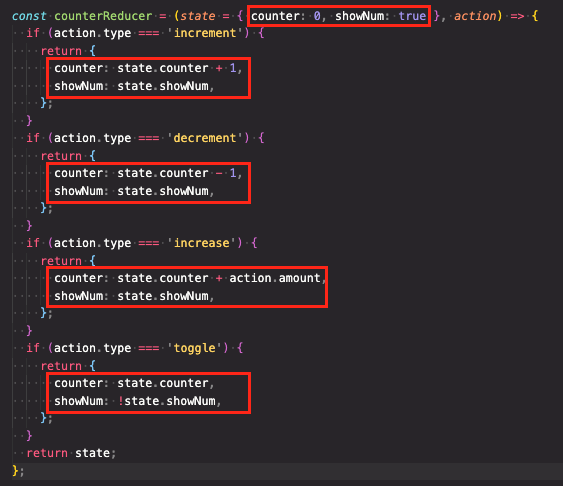
しかし、Redux Toolkitではその心配はありません。
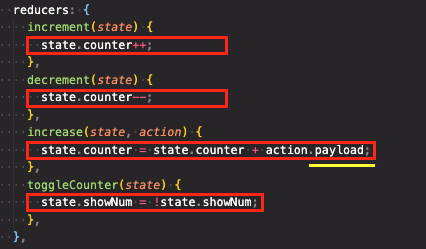
上図のように変更する内容だけを記述するだけで、Redux Toolkitが変更しないstateを維持しながら新しいデータに上書きをしてくれます。
また通常のReduxではstateとactionをセットでReducer関数に入れないといけませんでしたが、Redux Toolkitはactionを省略できます。
increaseの時はamountを別で設定しているためこう言う場合はactionを設定しましょう。
ただしRedux Toolkitでのstoreはactionに渡すプロパティ名は「payload」と指定されています。
dispatchする方法
dispatchするにはactionクリエーターを使います。
import { createSlice, configureStore } from '@reduxjs/toolkit';

const initialState = { counter: 0, showNum: true };

const counterSlice = createSlice({
  name: 'counter',
  initialState: initialState,
  reducers: {
    increment(state) {
      state.counter++;
    },
    decrement(state) {
      state.counter--;
    },
    increase(state, action) {
      state.counter = state.counter + action.payload;
    },
    toggleCounter(state) {
      state.showNum = !state.showNum;
    },
  },
});

const store = configureStore({
  reducer: counterSlice.reducer,
});

export const counterActions = counterSlice.actions;

export default store;
最後から2行目で「counterSlice.actions」と記述しています。
これはactionクリエーターと言われ、この直後に、createSliceで作ったオブジェクトの中のreducersオブジェクトのメソッドを繋げることでdispatchできます。
通常はコンポーネントからdispatchさせるので、storeではactionクリエーターだけを作ってエクスポートします。
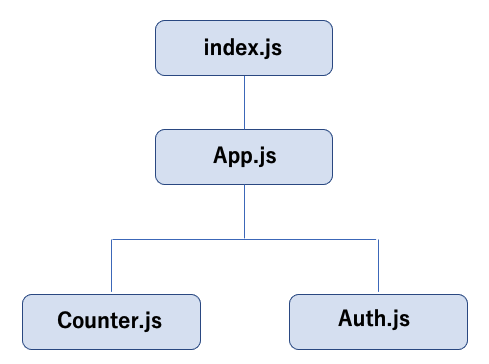
次にstoreで作ったactionクリエーターをCounter.jsにインポートします。
import { useSelector, useDispatch } from 'react-redux';

import { counterActions } from '../store/store';

const Counter = () => {
  const counter = useSelector((state) => state.counter);
  const show = useSelector((state) => state.showNum);
  const dispatch = useDispatch();

  const incrementHandler = () => {
    dispatch(counterActions.increment());
  };
  const decrementHandler = () => {
    dispatch(counterActions.decrement());
  };
  const increaseHandler = () => {
    dispatch(counterActions.increase(5));
  };
  const toggleHandler = () => {
    dispatch(counterActions.toggleCounter());
  };
  return (
    <div>
      {show && <h1>{counter}</h1>}
      <div className="counter-btn">
        <div className="btn" onClick={incrementHandler}>
          +1
        </div>
        <div className="btn" onClick={increaseHandler}>
          +5
        </div>
        <div className="btn" onClick={decrementHandler}>
          -1
        </div>
      </div>
      <div className="btn" onClick={toggleHandler}>
        表示/非表示
      </div>
    </div>
  );
};

export default Counter;
そして上記のようにdispatch(counterActions.メソッド())と書けば完成です。
increase(5)になっているのはRedux Toolkitではactionの設定をしないので、この様な形でメソッドの引数として追加情報を渡しています。
これが先ほど紹介したstore.jsの「payload」の値になります。
ここで最初に説明した、通常のReduxでは問題になり得ることが2つ解消されています。
それは、「action.typeが増えてることで打ち間違えの危険性がある」と「管理するデータを誤って上書きしてしまう可能性」の2つです。
今まではactionオブジェクトのtypeをわざわざ作り、storeで再度そのtypeを使ってだし分けなければいけませんでしたが、Redux Toolkitを使うことでメソッドを指定するだけでよくなりました。
こうすることでわずかですが、打ち間違えの危険性は少なくなりました。またデータの上書きも起きないようになりました。
これでRedux Toolkitでの書き換えは完了しました。
問題なく動いています。
通常のReduxでの記述に比べRedux Toolkitの方が記述量が減り、コンパクトにまとまったように見えます。
複数のstateを管理できる
今まではカウンターの数値のstateの管理だけでしたが、ここでログインログアウトの別のstateの管理も追加します。
実装結果はこうです。
ちなみにログイン/ログアウトを切り替えても他の挙動に何も影響ありません。
まずはstore.jsにログイン/ログアウトの内容を書きます。
import { createSlice, configureStore } from '@reduxjs/toolkit';

const initialState = { counter: 0, showNum: true };

const counterSlice = createSlice({
  name: 'counter',
  initialState: initialState,
  reducers: {
    increment(state) {
      state.counter++;
    },
    decrement(state) {
      state.counter--;
    },
    increase(state, action) {
      state.counter = state.counter + action.payload;
    },
    toggleCounter(state) {
      state.showNum = !state.showNum;
    },
  },
});

// 新しいstate管理↓↓
const initialAuthState = {
  isAuth: false,
};

const authSlice = createSlice({
  name: 'auth',
  initialState: initialAuthState,
  reducers: {
    login(state) {
      state.isAuth = true;
    },
    logout(state) {
      state.isAuth = false;
    },
  },
});

// 複数のreducerを一つにまとめている↓↓
const store = configureStore({
  reducer: {
    counter: counterSlice.reducer,
    auth: authSlice.reducer,
  },
});

// 各actionクリエーターをエクスポートしている↓↓
export const counterActions = counterSlice.actions;
export const authActions = authSlice.actions;

export default store;
繰り返しの部分があるので細かな部分の説明は省略します。
複数のReducerを一つにまとめる時はconfigureStoreを下記の様にreducerに対してオブジェクトを作り、記述していきます。キー(下記のcounterやauth)は任意で名前をつけます。
// 複数のreducerを一つにまとめている↓↓
const store = configureStore({
  reducer: {
    counter: counterSlice.reducer,
    auth: authSlice.reducer,
  },
しかし元々は下記の形だったので上記に記述を変えることで各コンポーネントのuseSelectorでの記述も変更する必要があります。
const store = configureStore({
  reducer: counterSlice.reducer,
});
このように変更します。(Counter.js。Auth.jsはこの後お見せします)
const counter = useSelector((state) => state.counter);
const show = useSelector((state) => state.showNum);
↓↓↓変更後↓↓↓
const counter = useSelector((state) => state.counter.counter);
const show = useSelector((state) => state.counter.showNum);
カウンターのactionクリエーターと同様にログイン/ログアウトのactionクリエーターをエクスポートします。
// 各actionクリエーターをエクスポートしている↓↓
export const counterActions = counterSlice.actions;
export const authActions = authSlice.actions;
次にAuth.jsはこのように記述します。
import { useSelector, useDispatch } from 'react-redux';
import { authActions } from '../store/store';

const Auth = () => {
  const isAuth = useSelector((state) => state.auth.isAuth);
  const dispatch = useDispatch();

  const loginHandler = () => {
    dispatch(authActions.login());
  };

  const logoutHandler = () => {
    dispatch(authActions.logout());
  };
  return (
    <div className="auth-container">
      {!isAuth && (
        <div className="auth-login auth-btn" onClick={loginHandler}>
          Login
        </div>
      )}
      {isAuth && (
        <div className="auth-logout auth-btn" onClick={logoutHandler}>
          Logout
        </div>
      )}
    </div>
  );
};
export default Auth;
これで完成です。
管理しやすいようにファイルを分ける
いくらRedux Toolkitを使っているといっても、扱うデータが増えるとファイルは長くなります。
ここではファイルの分割について解説します。
ファイル構成は上記のようになります。
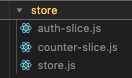
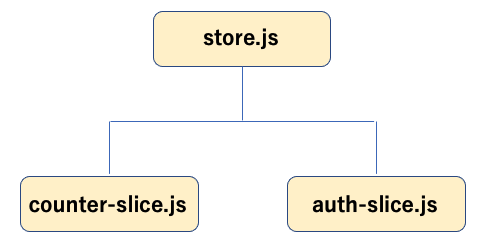
store.jsを親として、各機能別でファイルを分けます。
まずはstore.jsです。
import { configureStore } from '@reduxjs/toolkit';
import counterSlice from './counter-slice';
import authSlice from './auth-slice';

const store = configureStore({
  reducer: {
    counter: counterSlice.reducer,
    auth: authSlice.reducer,
  },
});

export default store;
次にcounter-slice.jsです
import { createSlice } from '@reduxjs/toolkit';
const initialState = { counter: 0, showNum: true };

const counterSlice = createSlice({
  name: 'counter',
  initialState: initialState,
  reducers: {
    increment(state) {
      state.counter++;
    },
    decrement(state) {
      state.counter--;
    },
    increase(state, action) {
      state.counter = state.counter + action.payload;
    },
    toggleCounter(state) {
      state.showNum = !state.showNum;
    },
  },
});
export const counterActions = counterSlice.actions;

export default counterSlice;
最後にauth-slice.jsです
import { useSelector, useDispatch } from 'react-redux';
import { authActions } from '../store/auth-slice';

const Auth = () => {
  const isAuth = useSelector((state) => state.auth.isAuth);
  const dispatch = useDispatch();

  const loginHandler = () => {
    dispatch(authActions.login());
  };

  const logoutHandler = () => {
    dispatch(authActions.logout());
  };
  return (
    <div className="auth-container">
      {!isAuth && (
        <div className="auth-login auth-btn" onClick={loginHandler}>
          Login
        </div>
      )}
      {isAuth && (
        <div className="auth-logout auth-btn" onClick={logoutHandler}>
          Logout
        </div>
      )}
    </div>
  );
};
export default Auth;
これでstoreのメンテナンス性がさらに向上しました。
最後まで残っていた「管理するデータ数が増えていきReducer関数が長くなりファイルが見にくくなる」という問題もこれで解消されます。
最後に
このコンテンツでは一般のエンジニアがどのように言語(今回はフレームワークになりますが)を学習し、つまずき、乗り越えていっているのかを垣間見えるようにしていこうと思います。
できるだけ画像、動画などを盛り込んで視覚的に理解できるように工夫しています。
少しでもこれからプログラミングを学ぼうと考えている方の為になる発信をできれば思いますので、温かい目で見てもらえると嬉しいです。
今回私がRedux Toolkitを解説する上で使った教材は、Udemyのコースになります。興味があればぜひ使ってみてください。
このコースの補足教材としてこのブログを使ってもらえると効果的だと思います。
ベストセラー取得